
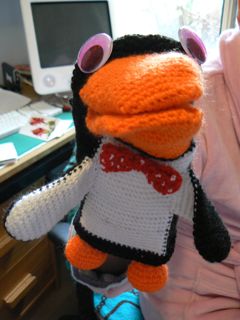
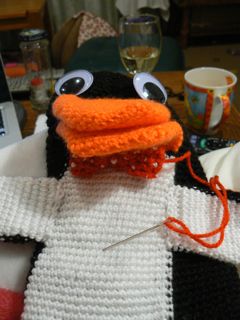
I designed this for my dad for Fathers’ Day. After all, what father wouldn’t want a psychotic penguin puppet? Best. Daughter. Ever.
I’ve made the pattern so that you start by making a fairly normal penguin puppet. You can then choose to adapt it to make Mr Flibble by adding his bow-tie and by colouring his eyes in pink.
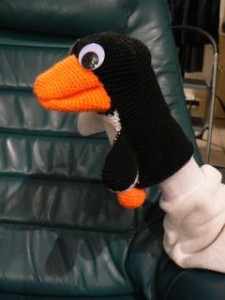
The pattern is written in American crochet notation and uses black, white, orange and red 8 ply wool and 4 mm hook. Mr Flibble is about 23 cm tall.
Head and body
With black wool
Round 1: 6sc in a magic ring (6 stitches)
Round 2: increase in every stitch (12 stitches)
Round 3: sc in the first stitch, increase in the next stitch – repeat (18 stitches)
Round 4: sc in the first two stitches, increase in the next stitch – repeat (24 stitches)
Round 5: sc in the first three stitches, increase in the next stitch – repeat (30 stitches)
Round 6: sc in the first four stitches, increase in the next stitch – repeat (36 stitches)
Round 7: sc in the first five stitches, increase in the next stitch – repeat (42 stitches)
Round 8: sc in the first six stitches, increase in the next stitch – repeat (48 stitches)
Round 9: sc in the first seven stitches, increase in the next stitch – repeat (54 stitches)
Round 10: sc in the first eight stitches, increase in the next stitch – repeat (60 stitches)
Round 11: sc in the first nine stitches, increase in the next stitch – repeat (66 stitches)
Round 12: sc in each stitch (66 stitches)
We now need to make a hole in the head for the beak. This involves switching from rounds to rows.
Rows 13 – 17: sc in the first 46 stitches (46 stitches) we are going to return to the start of this row so that we don’t change the texture of the crochet. To do this draw out the loop so that it is long enough to reach back to the start of the row. Make sure the wool you are working with is also long enough to reach back to the start of the row. Then just pop your hook into the first stitch in the row and continue crocheting. You will be crocheting over the top of the drawn out loop and wool so that it is hidden. This is a bit fiddly but it means you will only ever be crocheting that row in one direction and the texture will look as if you are doing a round even though you a working in rows. Magic!
We now go back to working in rounds and start the body.
Round 18: chain 20, join to the other side, sc in the next 46 stitches to complete the round (66 stitches)
Rounds 19 – 43: sc in each stitch (66 stitches) (the first twenty stitches are white, the next 46 stitches are black, so in other words, there is a white patch under the beak)
Rounds 44 – 46: sc in each stitch (66 stitches) (just black)
Fasten off, weave in end.
Beak (make two)
With orange wool
Round 1: chain 10
Round 2: sc 8 along one side of chain, increase, sc 7 in remaining loop on other side of chain, increase (19 stitches)
Round 3: increase, sc 7, increase, increase, sc 8, increase (23 stitches)
Rounds 4 – 5: sc in each stitch (23 stitches)
Round 6: sc, increase, sc 8, increase, sc, increase, sc 9, increase (27 stitches)
Rounds 7 – 8: sc in each stitch (27 stitches)
Round 9: increase, sc 11, increase, sc, increase, sc 10, increase, sc (31 stitches)
Rounds 10 – 11: sc in each stitch (31 stitches)
Round 12: sc, increase, sc 12, increase, sc, increase, sc 13, increase (35 stitches)
Rounds 13 – 14: sc in each stitch (35 stitches)
Round 15: increase, sc 14, increase, sc, increase, sc 15, increase, sc (39 stitches)
Rounds 16 – 17: sc in each stitch (39 stitches)
Fasten off, leaving a long tail for sewing.
Wings (make two)
With black wool, joining in the white wool after the first three stitches
Round 1: 6 sc in a magic ring (6 stitches) (3 black, 3 white)
Round 2: increase in every stitch (12 stitches) (6 black, 6 white)
Round 3: sc in the first stitch, increase in the next stitch – repeat (18 stitches) (9 black, 9 white)
Round 4: sc in the first two stitches, increase in the next stitch – repeat (24 stitches) (12 black, 12 white)
Rounds 5 – 17: sc in each stitch (12 black, 12 white)
Fasten off, leaving a long tail for sewing.
Feet (make two)
With orange wool
Round 1: 6sc in a magic ring (6 stitches)
Round 2: increase in every stitch (12 stitches)
Round 3: sc in the first stitch, increase in the next stitch – repeat (18 stitches)
Round 4: sc in the first two stitches, increase in the next stitch – repeat (24 stitches)
Rounds 5 – 6: sc in each stitch (24 stitches)
Round 7: sc in the first two stitches, decrease the next two stitches together – repeat (18 stitches)
Round 8: sc in the first stitch, decrease the next two stitches together – repeat (12 stitches)
Stuff
Round 9: decrease until the hole closes.
Fasten off, weave in end.
Assembly
Sew the beak and eyes to the head. Sew the wings and feet to the body.
To make Mr Flibble
Bow-tie
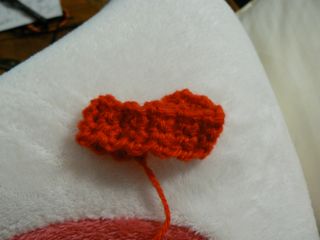
With red wool
Row 1: chain 4 (one is a turning chain)
Rows 2 – 21: sc in each stitch (3 stitches)
Fasten off, leaving a long tail for sewing.
Fold the two ends in to the middle.
Sew down. Wrap the wool around the tie tightly a little to the right of the middle. Sew in place. Repeat a little to the left of the middle. You will then hopefully have a bow tie shape.
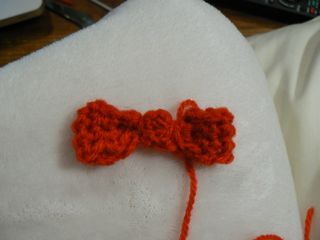
Leave the wool dangling because you will use it to attach the tie to the puppet.
Use white wool to embroider some polka dots.

Sew the tie onto Mr Flibble.
Colour the eyes in pink with a highlighter (be careful, it will be wet for AGES afterwards).
Congratulations. You now have a Mr Flibble with which to terrify your friends and family.